
Aprende en Comunidad
Avalados por :


¡Acceso SAP S/4HANA desde $100!
Acceso a SAPExplaining SERVER Side Outlook Integration for Business Users: Features, Functions, and Limitations
- Creado 01/03/2024
- Modificado 01/03/2024
- 186 Vistas
0
Cargando...
Goal of this blog:
The goal of this blog is to explain the administration and usage of the SERVER side outlook integration. It should not replace the official documentation which can be found here:
Please check the following link for the latest specifications- choose the latest release.
End-user:
https://help.sap.com/viewer/e3d4d4173c6f4231a6a35885511484ee/1802/en-US/b629f2105f464cb182c9398b1b95...
Admin:
https://help.sap.com/viewer/cea15f900ca04c4faa35d3044577fe27/1802/en-US/76e20fe2ccac4ccf8646a0f9fa61...
In addition to the official documentation the blog explains some features and functions more in detail and brings them into a context. Also it should help to understand some functions better from a business point of view and also the current limitations. In some cases which are important to know the blog refers to the right chapter of the official documentation instead of copy and paste the data to the blog
Please consider that all screenshots below showing the add in are taken in the outlook browser version. If you use webmail or webapps the user experience is a different one.
Also please be aware that comments/questions for this blog are NOT monitored!
if you need help setting up the feature - please contact Customer Experience Expertservices:
[email protected]
.
All administration work is done from the admin view of the client side server integration within C4C.
Prerequisites for the usage of the SERVER side server integration can be found here:
Please check the following link for the latest specifications - choose the latest release.
https://help.sap.com/viewer/e3d4d4173c6f4231a6a35885511484ee/1802/en US/a4db11343aaa4e9ca0e5950cb2038341.html
As an administrator you have to do the following steps before you can start to provisioning the new feature to the business users.
Step 1
Assign the workcenter Email integration to your user role within the standard user administration along with its two views.
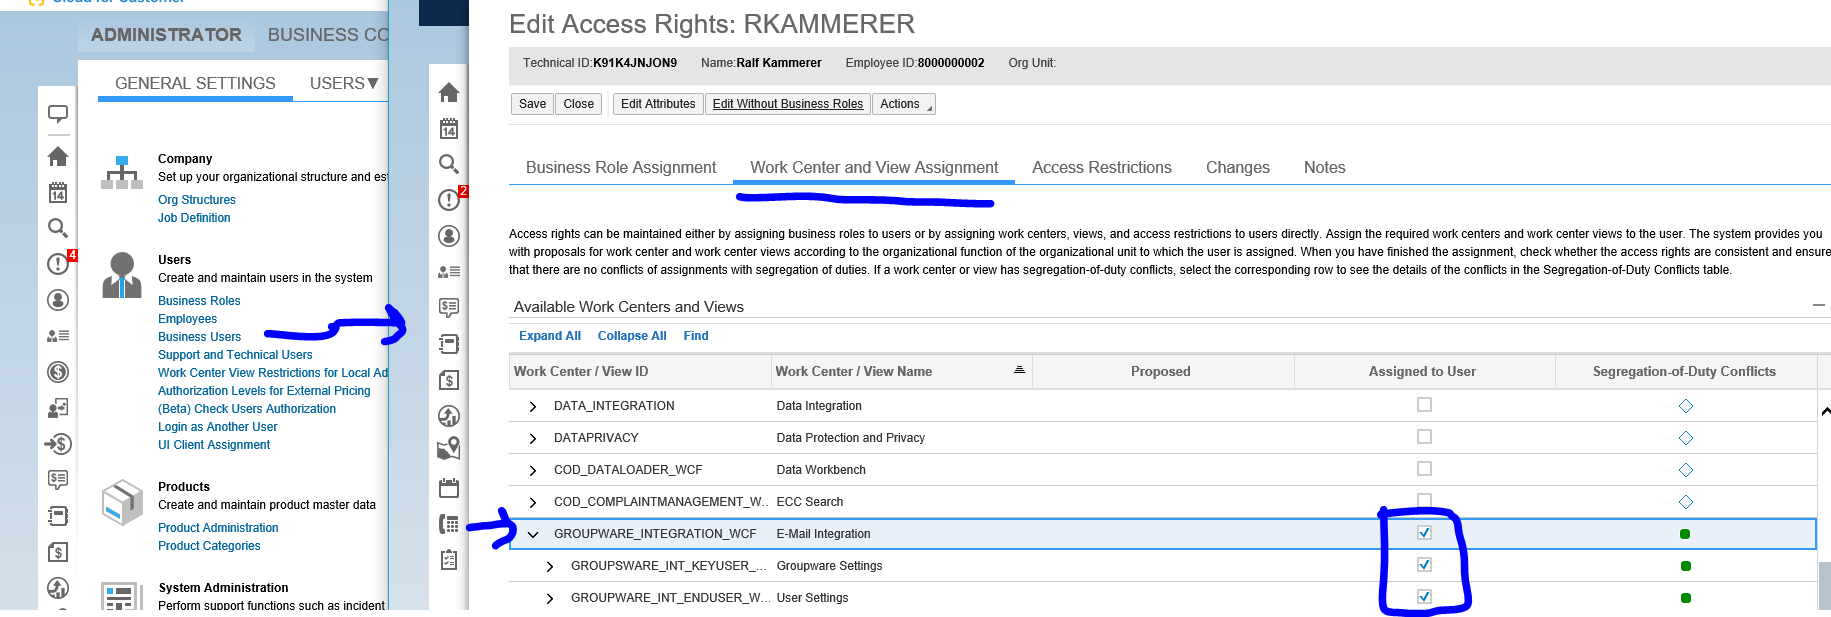
The view ‘Groupware settings’ will give you access to the admin features.
The view ‘User settings’ will give you the features which you need as a business user.
As a result you will see a new workcenter ‘Email integration’ with the two views.
Since you are an admin your user will automatically provisioned for the server side outlook integration. Therefore an admin user will never show up in the provisioning tab but always in the user tab from the beginning.
Step 2
Check the pre-delivered settings and adopt them if required.
In order to do this, a general understanding on how to provision users is required and will be explained now…
The user provisioning is done as follows:
Grant users access to the email workcenter
Provision users within the admin view ‘Groupware settings’
The goal of this blog is to explain the administration and usage of the SERVER side outlook integration. It should not replace the official documentation which can be found here:
Please check the following link for the latest specifications- choose the latest release.
End-user:
https://help.sap.com/viewer/e3d4d4173c6f4231a6a35885511484ee/1802/en-US/b629f2105f464cb182c9398b1b95...
Admin:
https://help.sap.com/viewer/cea15f900ca04c4faa35d3044577fe27/1802/en-US/76e20fe2ccac4ccf8646a0f9fa61...
In addition to the official documentation the blog explains some features and functions more in detail and brings them into a context. Also it should help to understand some functions better from a business point of view and also the current limitations. In some cases which are important to know the blog refers to the right chapter of the official documentation instead of copy and paste the data to the blog
Please consider that all screenshots below showing the add in are taken in the outlook browser version. If you use webmail or webapps the user experience is a different one.
Also please be aware that comments/questions for this blog are NOT monitored!
if you need help setting up the feature - please contact Customer Experience Expertservices:
[email protected]
.
1. General set up – Administrator
All administration work is done from the admin view of the client side server integration within C4C.
Prerequisites for the usage of the SERVER side server integration can be found here:
Please check the following link for the latest specifications - choose the latest release.
https://help.sap.com/viewer/e3d4d4173c6f4231a6a35885511484ee/1802/en US/a4db11343aaa4e9ca0e5950cb2038341.html
1.1. First steps as an administrator
As an administrator you have to do the following steps before you can start to provisioning the new feature to the business users.
Step 1
Assign the workcenter Email integration to your user role within the standard user administration along with its two views.
The view ‘Groupware settings’ will give you access to the admin features.
The view ‘User settings’ will give you the features which you need as a business user.
As a result you will see a new workcenter ‘Email integration’ with the two views.
Since you are an admin your user will automatically provisioned for the server side outlook integration. Therefore an admin user will never show up in the provisioning tab but always in the user tab from the beginning.
Step 2
Check the pre-delivered settings and adopt them if required.
In order to do this, a general understanding on how to provision users is required and will be explained now…
The user provisioning is done as follows:
Grant users access to the email workcenter
- Assign the Workcenter ‘Email Integration’ and ONLY the view ‘user settings’ via the standard user administration.
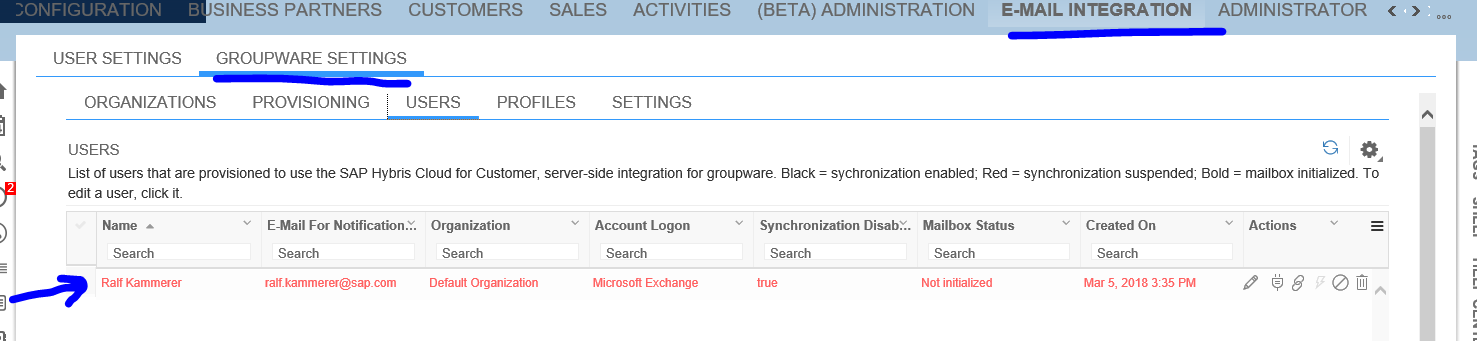
Provision users within the admin view ‘Groupware settings’
- choose the users you want to provision from the list of all C4C users. Then you assign them to an Organization (will be explained later in detail). The Organization determines the Mailbox access type
Pedro Pascal
Se unió el 07/03/2018
Facebook
Twitter
Pinterest
Telegram
Linkedin
Whatsapp
Sin respuestas
 No hay respuestas para mostrar
Se el primero en responder
No hay respuestas para mostrar
Se el primero en responder
© 2026 Copyright. Todos los derechos reservados.
Desarrollado por Prime Institute
Hola ¿Puedo ayudarte?